Some Practical Uses for Xcode Build Schemes and Build Configurations (Swift)
Have you ever wanted to use the exact same codebase for both a free version and a paid version of your iOS app? Does your client have both a development and a production server that the same code needs to talk to? Do you need to create an internal ad-hoc build of your app for testers on your team?
If you have ever answered “yes” to any of these questions, it sounds like you need a custom build scheme.
I wish I had discovered the awesomeness that is the Xcode build scheme sooner. As a developer, they give you the ability to deliver different versions of the same code with small tweaks for different environments. Once you learn how to use them, you will love them too.
With custom build schemes, you can
- Write code that only runs on the free version of your app, allowing you to show ads or offer in-app purchases without duplicating targets or project files.
- Flick a switch to deliver a build that talks to the production server after testing your app in a development environment.
- Build and distribute an internal app that you can deploy to testers on your team.
TL;DR Build Schemes will save you ridiculous amounts of time.
Using Build Configurations to create a free version of your app
The numbers are in. Whether we like it or not, the most profitable apps are offered for free. The bulk of the money is made showing ads and selling in-app purchases.
That means if you want to run a profitable iOS app business, you probably need to offer a free version of your app.
I naturally recoiled the first time I heard this. I didn’t get into this business to sell advertising. I got into it because I wanted to create beautiful products that I would want to use.
The prospect of muddying my elegant designs with ugly banners selling “your grandmother’s weird little trick to get rid of belly flab” made me feel a little queasy.
Frankly, it still does. I somehow managed to justify the ads by telling myself that as long as I offer a choice between a paid and free version of an app, I am not committing a sin against design. If enough people like the free version, it will drive more people to the paid version.
Now I can sort of sleep at night, and build schemes are partly responsible for that.
Build Schemes are great because they give you the ability to write code that only applies to the free version of your app (or the paid version if you have some in app purchases that only apply there). In the past, I struggled with this, trying all sorts of bone-headed things.
Some naive things I did that wasted a lot of time
- In one of my projects, I created two separate targets, one for the paid version and another for the free version. This actually worked, but it ended up being far more work than was needed.
- Really early in my developer days, I actually duplicated all of the source files just for the free version. I don’t need to tell you why that’s a horrible idea.
Learn from my mistakes, and don’t do either of these! Read this article and follow these steps. The end result will be much more manageable.
The Difference Between Build Schemes & Build Configurations
When I started iOS development, I didn’t know what a build scheme was. After all, most apps only use a single build scheme by default.
I think the one thing that really hindered my understanding of build schemes was this other distinction between a development build and a release build. I thought those were different build schemes, but they’re actually different build configurations.
A build scheme is a blueprint for an entire build process, a way of telling Xcode what build configurations you want to use to create the development, unit test, and production builds for a given target (framework or app bundle).
A build configuration is a specific group of build settings that can be applied to any target.
Most app projects come with two build configurations and one build scheme. You get the debug and release build configurations along with a build scheme that runs the debug configuration for debugging purposes and the release configuration for archiving/submission.
For most projects, this is perfectly fine and requires no tweaking. However, if you want to offer both a free and paid version of the same app, it’s not quite enough.
Adding a new build configuration
When you want to make a free version of your app, you need to start by adding a new build configuration. I wish this were easier, but it’s not. That’s why I am going to walk you through it.
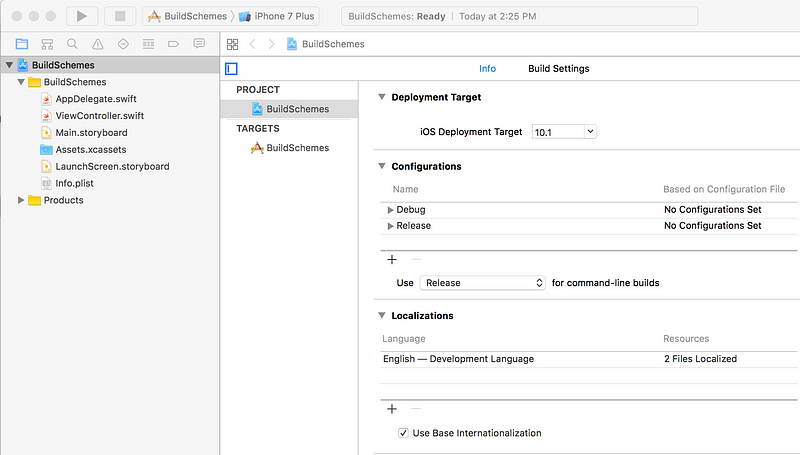
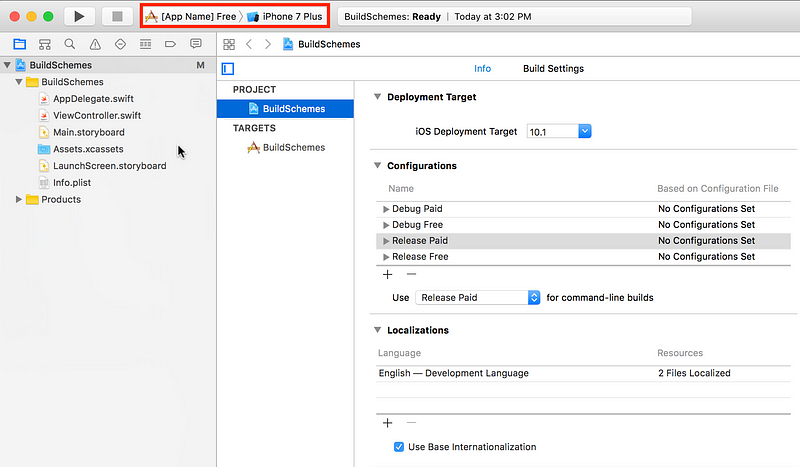
- Open Xcode and select the project file like so.
Now stay where you are! Xcode is incredibly persnickety about the things you can and can’t select when you try to add a new build configuration.
If you have anything other than the project file selected, the “duplicate configuration” options will both be grayed out. There’s an entire Stack Overflow thread dedicated to this.
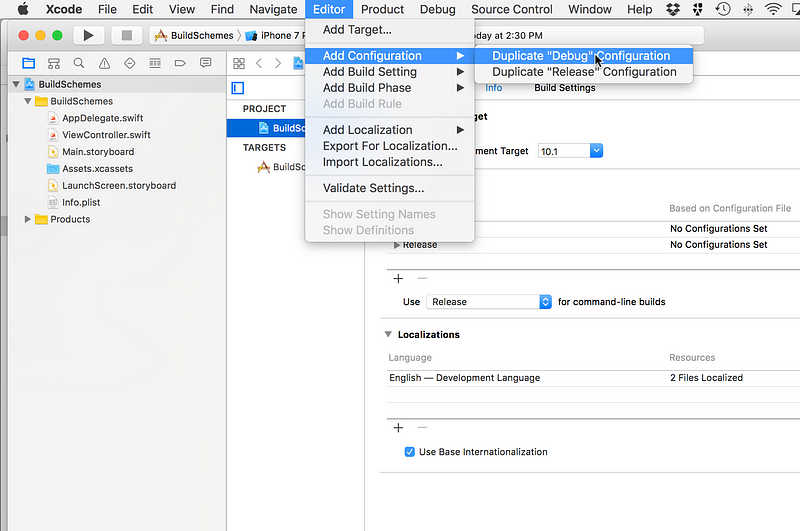
2. Go to Editor → Add Configuration → Duplicate Debug Configuration
3. Repeat this process for the Release Configuration.
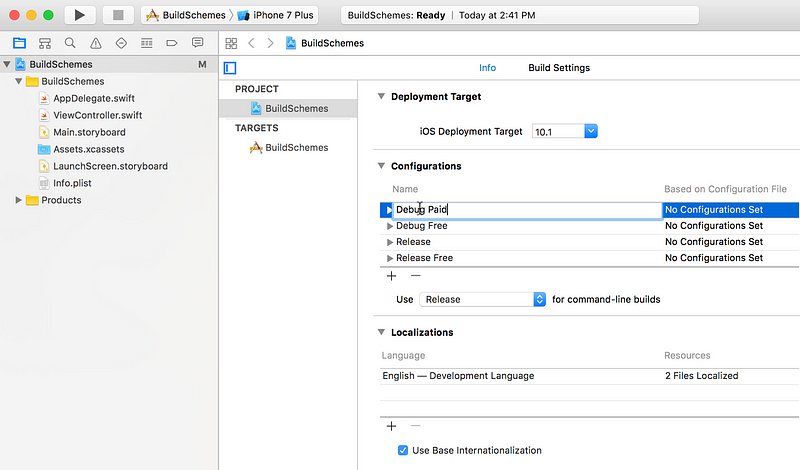
4. Rename your configurations to match the paid/free distinction.
When you’re all done, you should have four different build configurations. Debug Paid, Debug Free, Release Paid, and Release Free.
Creating a separate build scheme for the Free version
The next part is really easy. We’re going to take our two new build configurations and create a build scheme that runs them.
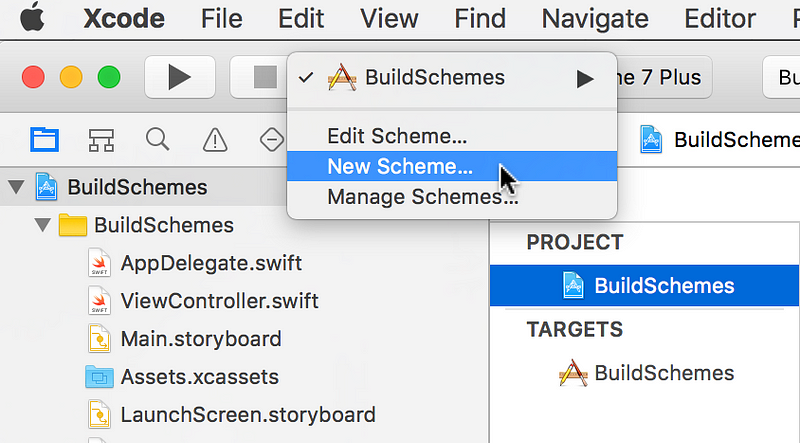
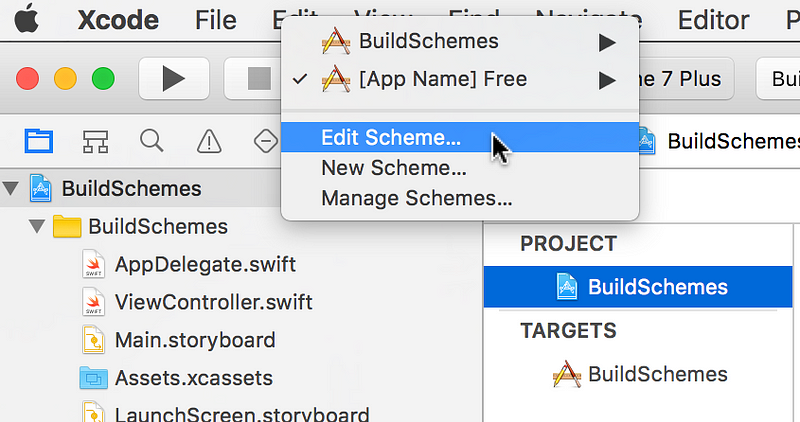
- Go to the scheme you’re currently running, click on it, and select “new scheme.”
This will open up a modal view where you can select the target and name your new build scheme.
2. Name your build scheme using your app name followed by “Free” and click O.K.
Once you’ve done this, you should notice that your free build scheme has been selected.
We’re not done yet. We have a build scheme, but it isn’t using our the free version build configurations yet.
3. Click on your build scheme and select “edit scheme.”
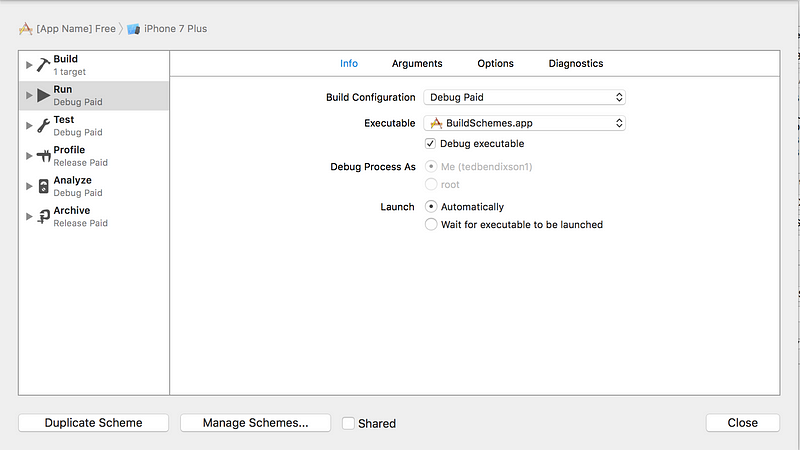
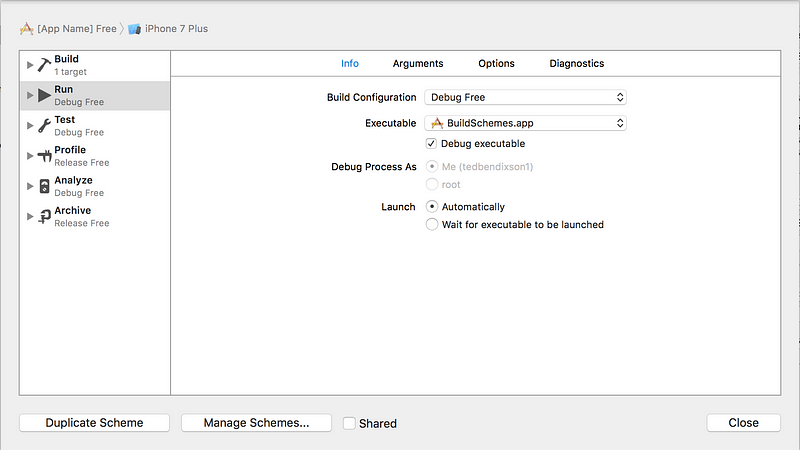
4. Switch everything that was running the paid build configuration over to the free build configuration.
Effectively, this
Should turn into this
That’s it. Now you have two build schemes. One of them will build the paid version of your app and the other will build the free version of your app.
Writing code that only runs on the free version of your app
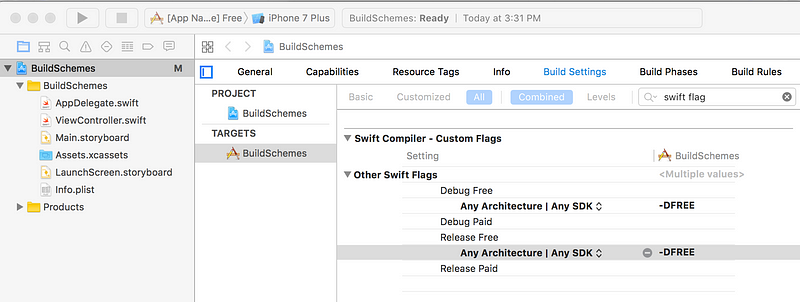
Unfortunately, having two separate build schemes isn’t quite enough. We also need a way to selectively run blocks of code on the free version only. To do that, we are going to add a custom Swift flag that only applies to the free version build configurations we just created.
- Go to Build Settings, and scroll down to “Other Swift Flags”
- Add the flag “-DFREE” to both of the Free build configurations.
Some of you may be wondering what the “-D” is all about. I did too. All you need to know is that Xcode’s build process is little more than a user-friendly version of the command line tools. It effectively wraps them. -D is the namespace for custom flags that can be passed into a build command.
You can ignore the “-D”. We just created a custom flag called “FREE”. It can be checked in the next step.
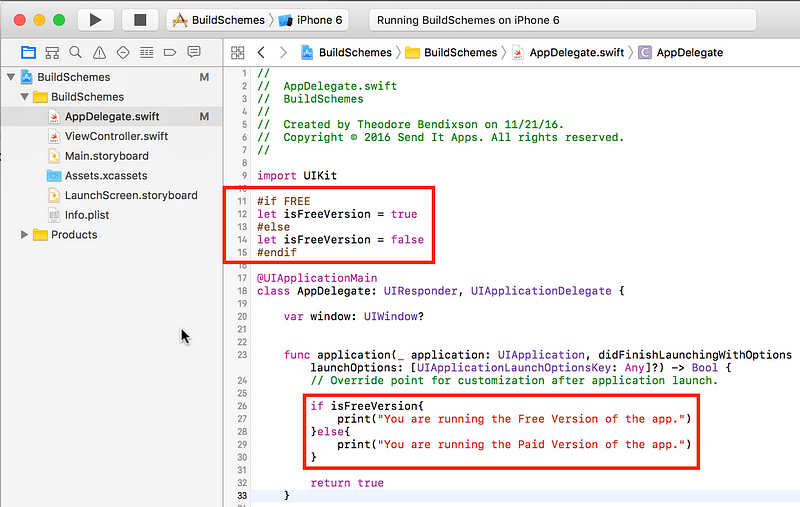
3. Go into your App Delegate and add these lines of code at the top.
Here’s what we just did. We created a global boolean variable called “isFreeVersion.” If we build from the free version’s build scheme, this boolean variable will be true. If we build from the paid version’s build scheme, it will be false.
We can use this variable anywhere in the app to check if we are running the free version. You might want to do this to show an ad banner or offer in-app purchases that are only meant to be in the free version.
But don’t take my word for it. Try it for yourself! If you also included the code in the “didFinishLaunching” method, you can build and run your app in both the free and paid build schemes.
When you run the app using the free version’s build scheme, you will see the free version’s message in the console. When you run the paid build scheme, you’ll see the paid version’s message. You’re all set to build a free version of your app.
Using a different bundle identifier for different build configurations
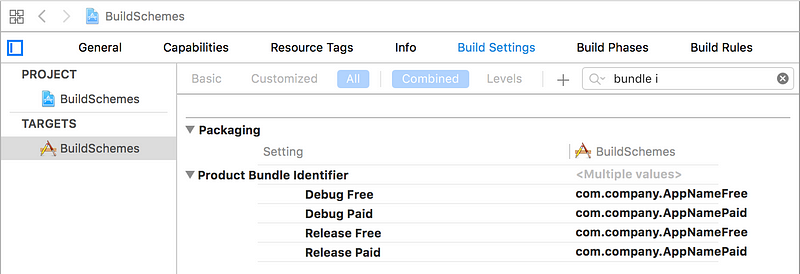
There’s just one last thing. Since we will be delivering two completely separate apps, we will need to setup our project to use a different bundle identifier for the free version.
You will need to do two things
- Create two app ids on your Apple Developer portal.
- Go to your project settings and set the appropriate bundle identifiers for both the paid and free build configurations.
That’s all there is to it. Now you are setup to deliver both paid and free versions of the same app, using the same shared codebase.

Comments
Post a Comment